

Website Design & Development Blog
Create a beautiful & inexpensive mural for your office!
As any true entrepreneur knows, first impressions are everything! Often people will critique their website, their attire, or perhaps their handshake. But have you considered your office? As you look around, do you see nothing but plain white walls? Then continue reading!
In this article we will walk you through an inexpensive method of decorating your office with a custom mural that will surely turn heads and strike up conversations. Best of all, this project allows you to indulge your inner creativity and customize the artwork to your office environment.
Approximate cost: $100
Necessary Tools & Items
- 3/8” foam board (quantity/size depends on size of mural)
- Double sided Velcro tape (quantity depends on size of mural)
- Ruler and/or spirit level
- 3M or Elmers spray adhesive
- X-Acto knife
Step 1: Selecting your artwork
The first step is selecting a proper photograph or artwork for your mural. In this tutorial we are creating a mural that is roughly 8’ x 4’ wide. Because you will be enlarging your image, it is crucial that you select an image that is large enough for your purposes. Failing to do so will result in a distorted, blurry and completely unrecognizable mural!
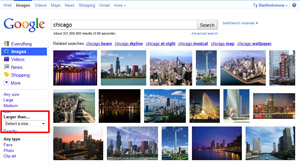
There are several outlets for finding suitable artwork for our project. Flickr is a great source for finding unique and beautiful photographs. We also suggest doing a Google Image Search. When searching for a photo, be sure to find one that is at least 2,000 x 2,000 pixels. You can do this in the Google image search by clicking the “At Least” filter on the left hand side, and selecting 4MP+.
Otherwise, if you have a 4 Megapixel + camera, we suggest taking your own photos. After all, this project is about expressing your inner creativity!
Note: If you are searching on the above mentioned websites, be sure to contact the photographer and ask for permission!
Step 2: Processing your artwork
Once you have found a suitable photo, the next step is to process the photo in a program called The Rasterbator. In short, this program will allow you to specify the size of the mural and will essentially split your large image in to several smaller images so they may be easily printed.
The Rasterbator has an online application as well as a program you can download to your computer. However due to popular demand, their website is frequently offline, so we recommend downloading the local program from here.
Once you have downloaded the application, complete the following steps:
- Select the image – Click browse to find the image file you saved to your computer
- Select the paper size – This step is critical. You must consider how you wish your mural to appear, either with larger and fewer pieces, or smaller and more pieces. In our mural, we selected an 11x17” paper size with landscape formatting.
- Define the output size – This is where you determine how large you want your mural to be. You can do this by selecting a specific dimension, or by specifying the number of pieces you want vertically and horizontally.
- Rasterbation options – For the purpose of this tutorial, we want the clearest possible image. The larger your image is, the more precise it will be printed. With this being said, we selected a dot size of 1 and a full color mode. Increasing the dot size will give you a mosaic effect, which is why we chose the smallest option.
- Processing & Exporting - Once you are satisfied with your presets, export your file as a PDF. When outputting the PDF it will provide printing instructions. Be sure to write these down to later communicate with your printer.
Step 3: Printing your artwork
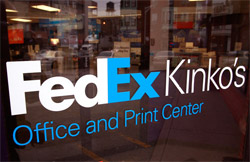
Printing a mural of this size will take a considerable amount of resources and most definitely more than the average person can accommodate for. Therefore, we suggest taking your artwork on a USB drive to your local Kinko’s.
When you arrive, tell them about your project as well as the instructions from the software. We also suggest printing your mural on a flat, thicker stock paper. We suggest flat paper because a glossy finish can cause quite a glare in the sunlight. Be sure to mention your page layout (portrait or landscape) as well as the scaling. We suggest asking for a preview of just one page of your PDF. Doing this will ensure that you have properly setup the file and printing options.
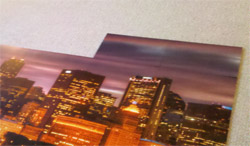
We also suggest you have Kinko’s cut the white margins off your images. Having Kinko’s do this will provide a consistent cut and save you a decent amount of time and an even bigger headache!
Once you have received your artwork, take it home and line it up on your floor! If everything looks right, move on to the next step!
Step 4: Preparing for mounting
This step is optional, however it really goes a long way to increase the professionalism of your mural. Simply taping individual sheets of paper to your wall will look tacky. We suggest taking an exact measurement of an individual piece of paper. (This will have changed from the original if you had the margins removed)
Once you have your measurement, call around your local community and inquire about foam board pricing. We found our local Dick Blick had the best pricing for 4’x8’ sheets of 3/8” foam board. Once you located your source, inform them you want X pieces of foam board cut at your specified measurements.
Note: Since foam board cutting can be a bit messy, we suggest using a fine grain sandpaper to quickly remove any nasty edges.
Step 5: Mounting your mural
In a well ventilated room, setup a workspace and cover any furniture with a drop cloth. Take one sheet of paper and spray an appropriate amount of adhesive to the back of your photo. Quickly, but carefully, apply this photo to a piece of your pre-cut foam board, making sure it is evenly placed. Repeat this step for all pieces of your mural.
Once you have mounted your mural on the foam board and it is drying you may begin preparing for the actual wall mounting. Since you have put your hard work into this project, you must consider that you will someday be moving to another office. With this in mind, we suggest using Velcro tape to apply the foam board to the wall. This provides an easy removal option and won’t distress your stacked mural pieces when moving. We suggest applying one inch pieces of Velcro strip to each corner of each mural piece.
Once you have the Velcro tape applied to the first top corner piece, mount it to your wall using a spirit level, also known as bubble level. Continue doing this for each piece of your mural. We suggest using a ruler and spacing each piece a half inch apart to add some character. Be sure to take your time doing this, however if you slip up, carefully pull the piece off and re-align it on the matching Velcro strips.
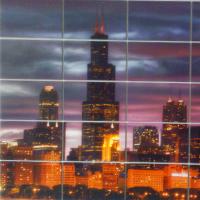
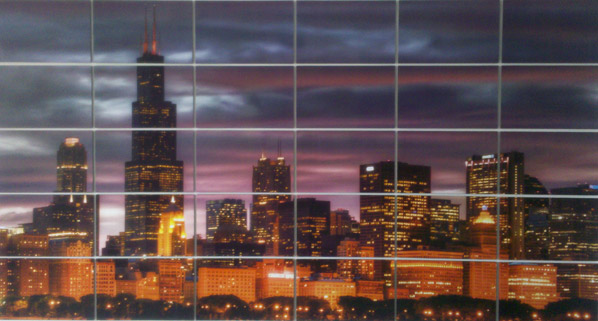
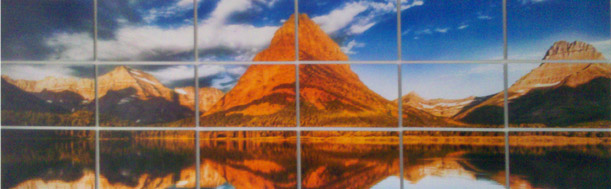
Step 6: Step back and enjoy!
Take a step back, breath and appreciate all your hard work – you’re done! You can see how our examples look below:
Recent Articles
-

Free Doc Type Sprite Icon Set!
-

The new ECS Jets website takes flight!
-

What Does the Sale of Skype To Microsoft Mean For Your Windows Devices
-

What Will Mango Do For Our WP7 Devices
-

How To Update Your WP7 Samsung Focus With The NoDo Update On AT&T
Pretty cool! Can you use bigger foam board?